A couple of painting questions

Ok, I´m gonna make a new thread for this, as I´m a bit past “very first impressions” and gave it some more playtime…

I think you should do an introduction to painting with Instamat, its not as intuitive as I´d like it to be.
I might be wrong, but it doesn´t seem like its your main focus, which is more centered on the procedural creation of materials.
Which is completely fine and probably more useful in terms of mass-creation-pipelines, than individual texturing.
I´ve also played around with adding graphs as effects to layers and its really cool: Painting a simple mask with some brush strokes and then transforming it with blur and erosion like filters can quickly create some really cool handpainted effects for example.
But I´m still not getting some of the very basics, or they just need a proper tutorial to guide newcomers through the process.
So, apologies if I assume stuff isn´t there already that actually is or that I just did it wrong, still a good reason to provide us with a painter-centric tutorial…:slight_smile:

Here are a couple of things I´ve been struggling with:

  1. I can´t make udims work.
    Also couldn´t find the info in the manual.
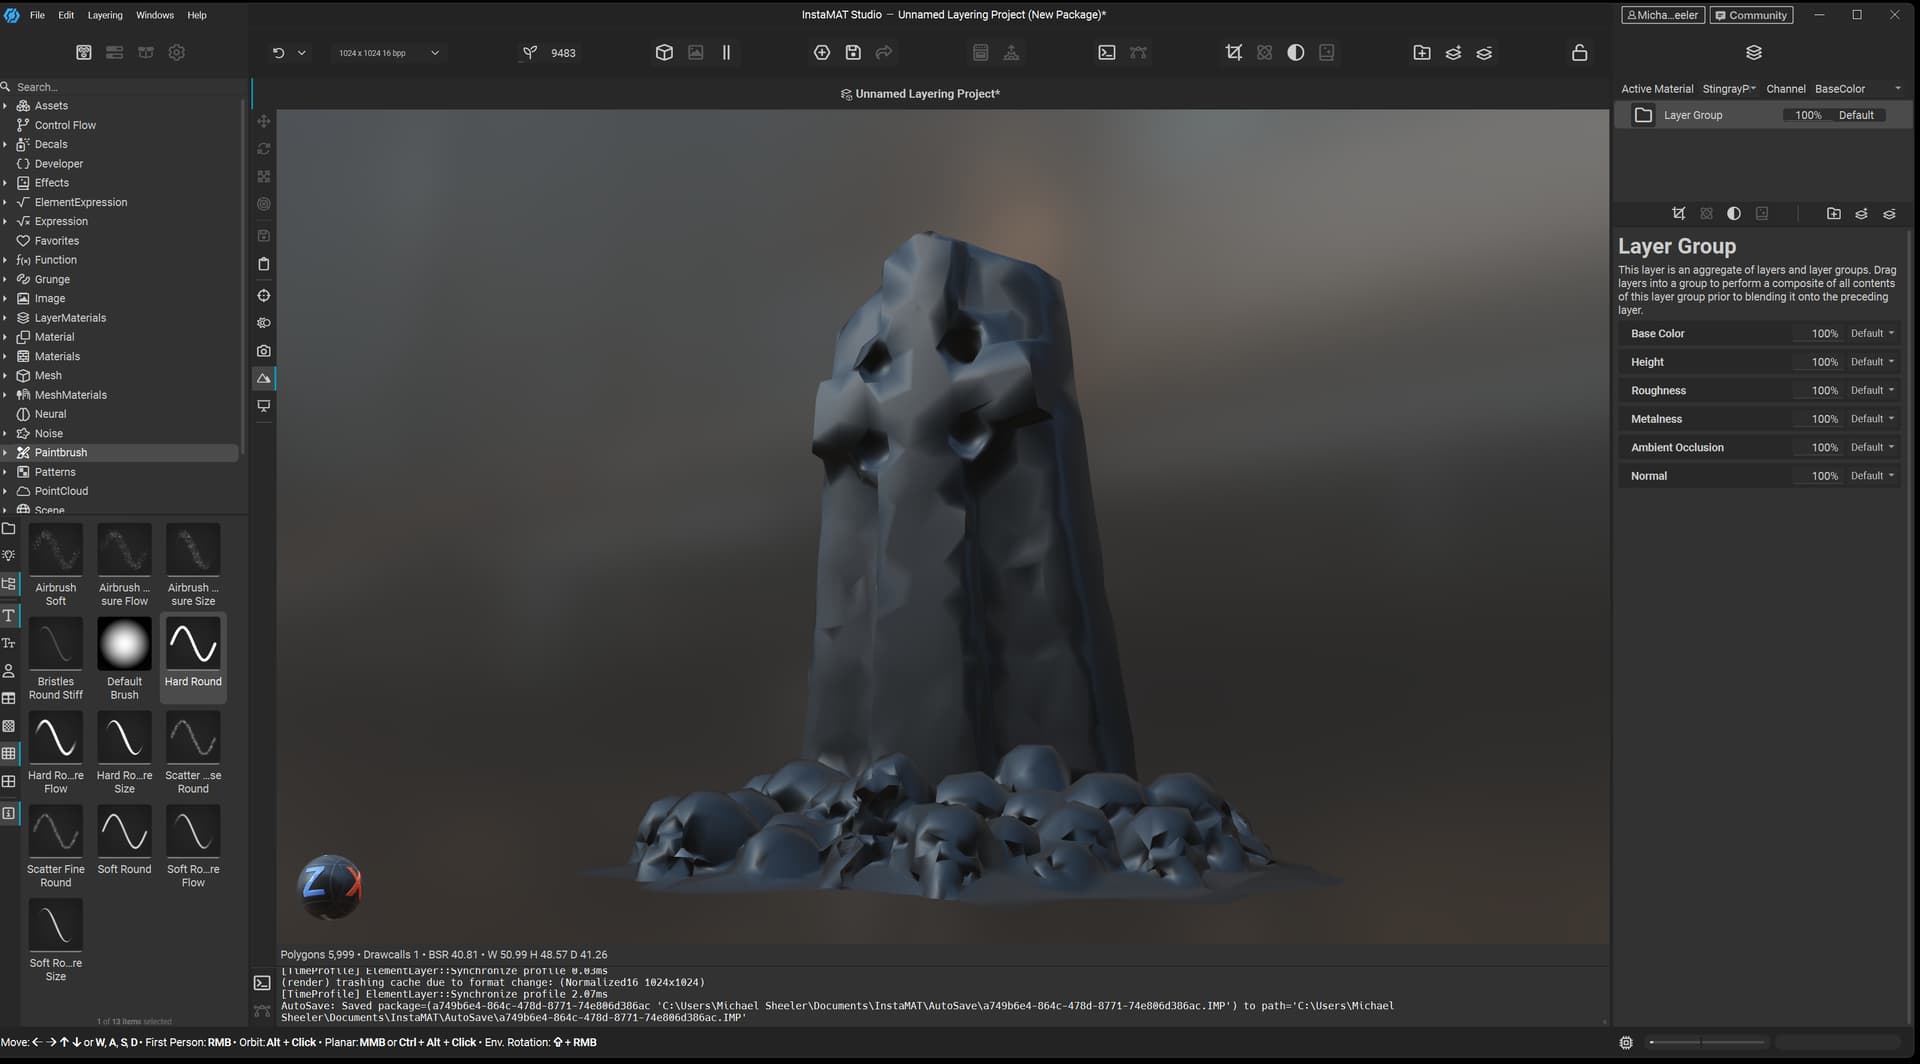
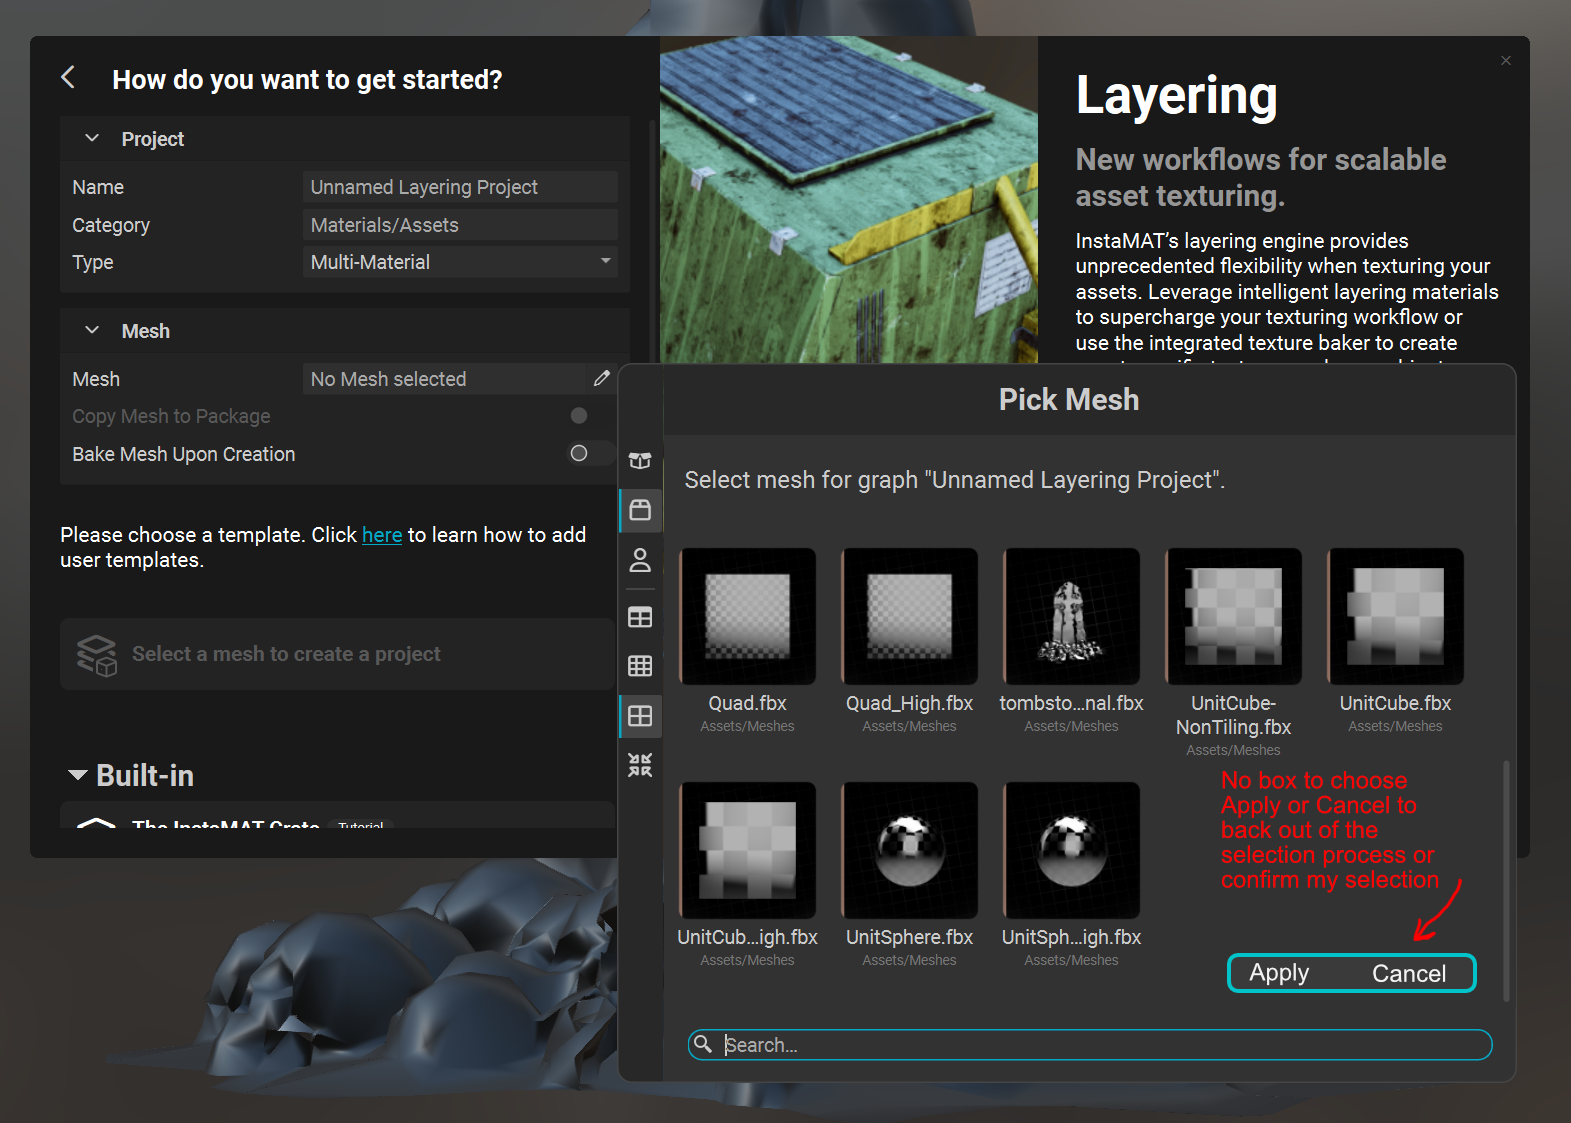
    I chose “UDIM” after creating a new “layering” project.
    Picked my udim fbx file, then added all the udim images.
    The mesh shows up correctly in the package with all udims and you can see at the beginning how the udims are separately filled with blue.
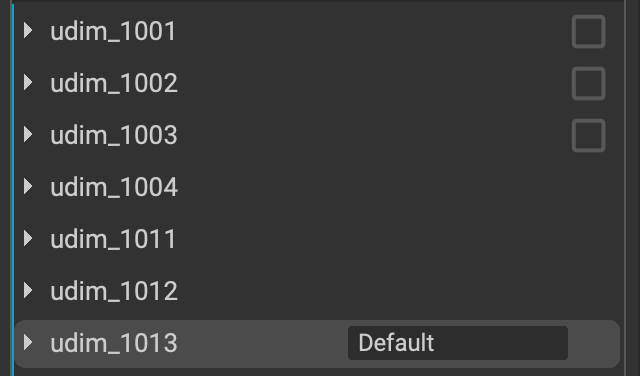
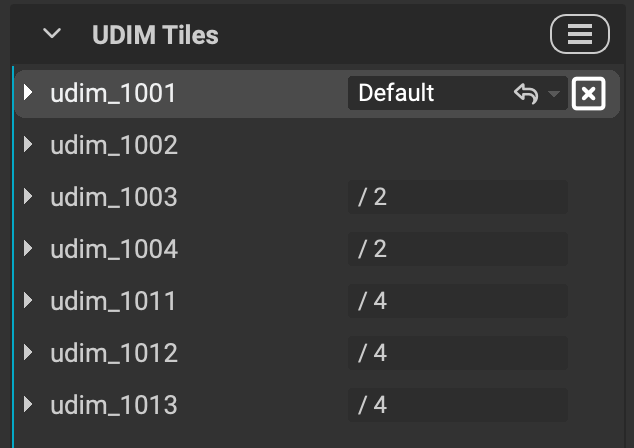
    But then when I try to assign the first udim, all the udims get THAT image assigned, instead of automatically getting the correct udim assigned. Also can´t drag all of them at once.
    I´ve tried renaming the suffix from “_1001” to “.1001” but that didn´t make a difference: Whatever tile I pick gets mapped correctly, but none of the others show up and it simply gets projected onto ALL tiles.
    There is also a selection at the top of the layer stack, where you can directly select the udim, but I couldn´t figure out what its for.
    At first I thought it might be an issue with the metahuman mesh I was using, but I tried with another UDIM mesh I knew was working, since I used in already in some renders and I had the same issues.
    I then also baked the mesh data, hoping that those maps would show up properly or that I could figure out what exact suffix I´d have to use, but those were also not mapped correctly.
    I CAN however also paint across all tiles.
  2. Brushes
    This is a bit more extensive in terms of feedback I have:
    A) Brush palette
    I know you can probably do powerful things with brushes already, by utilizing graphs etc.
    I´m used to workflows though, where I can quickly pick brushes from a palette and I´m missing that option here. A dedicated panel to pick brushes or a simpler way to navigate would be greatly appreciated.
    B) Took me a while to find the pen dynamics settings. While its great to have granular control over what and how much pen pressure affects painting, I´d prefer aan additional buttom simply to enable/disable pen pressure. Also I don´t know if you can save these as default settings for a brush.
    Like, I wanna have a default soft round brush, that simply reacts to size and opacity using pen pressure and I don´t always wanna change that per project.
    C) Speaking of defaults and saving brushes: I couldn´t yet figure out how to save my own custom brushes.
    If you wanna use instamat mainly for manually texture painting, this is pretty essential.
    D) Brush dragging.
    Both Zbrush and Blender have the option to drag a brush with alpha. I couldn´t find that option. Having decals is great, but its a different workflow, for quickyl painting a bunch of veins for example, I´d love to just drag and scale/rotate it with a brush.
    E) Color variation.
    It would be quite useful to also have the option to use color variation in the brush settings.
    Like, either using a gradient (mapping it to black and white values on an alpha can be very useful) or or random hue/value variation.
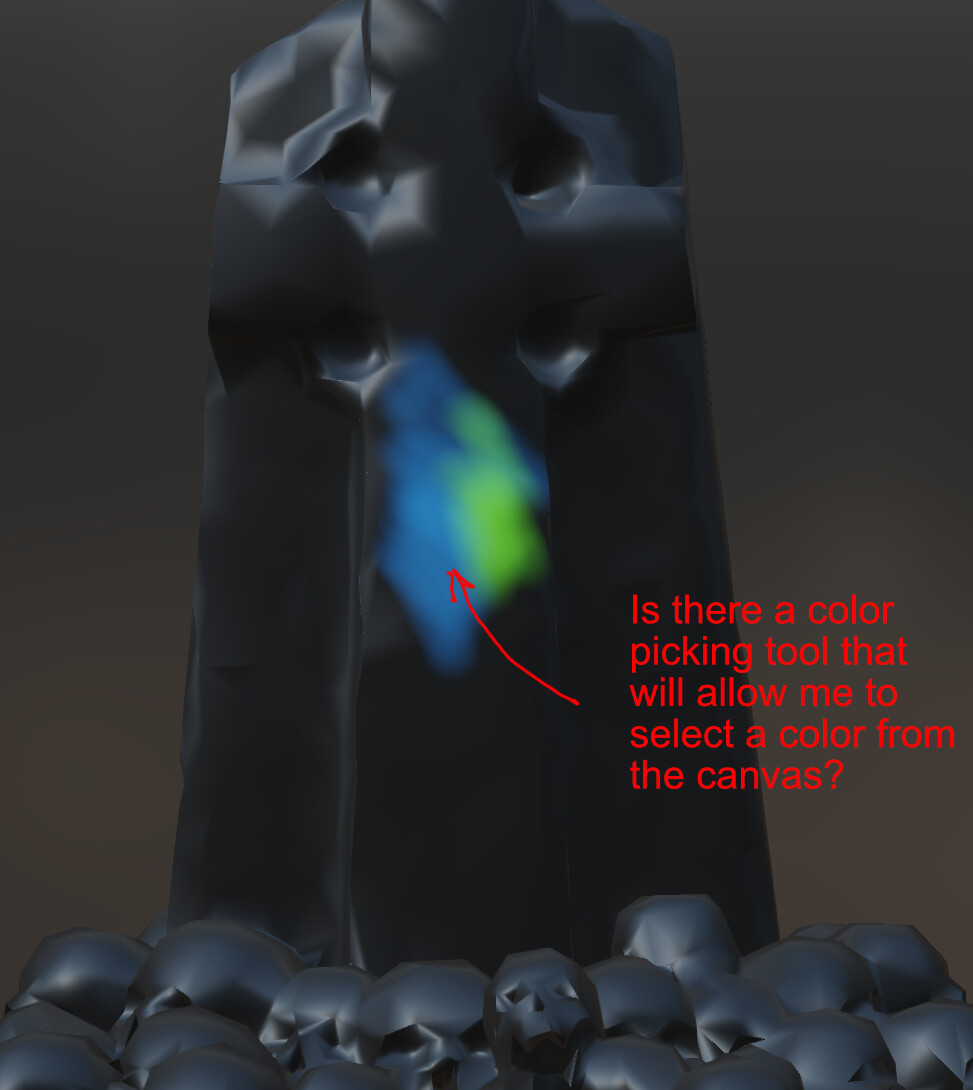
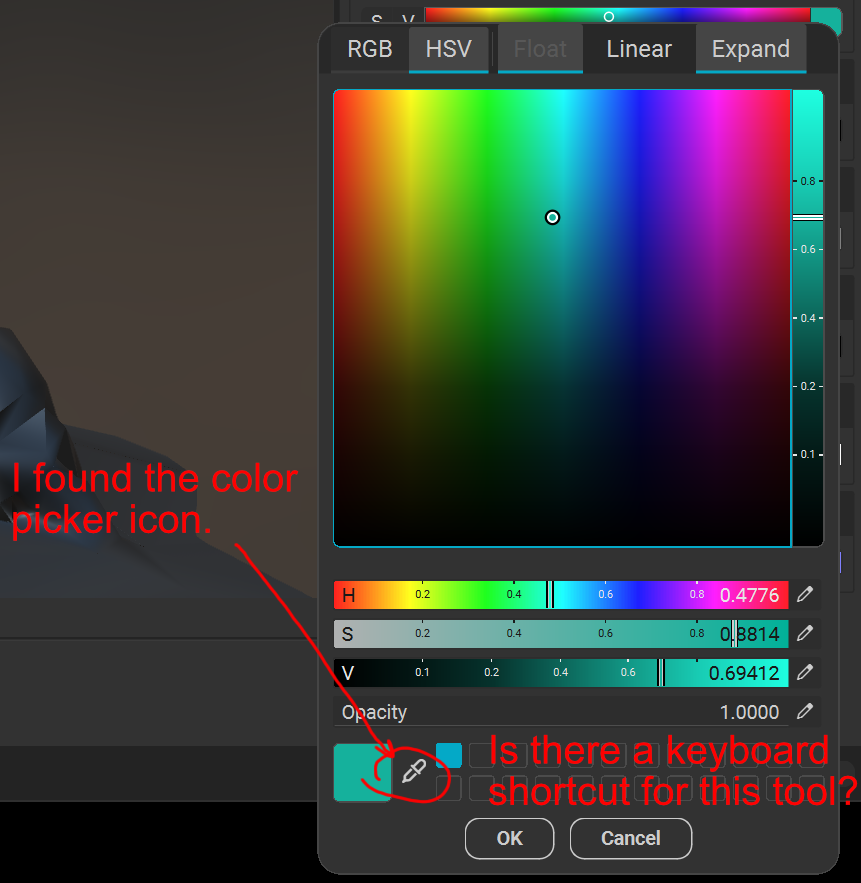
    F) Quick color switcher
    As I´ve mentioned before: Having a simple Background/foreground color switcher can also make painting a lot easier.
    G) Brush/Erase
    For masking its enough to just able to switch between painting and masking. That should be doable using B and E, but for me those shortcuts don´t work rn.
    I can switch to E, but then can´t switch back to B.
    I also couldn´t find these shortcuts in the preferences, so I might reassign them
    F) Alpha/Texture vignette.
    I couldn´t find the option to quickly apply a radial mask to vignette a rectangular alpha for example.
    G) Shortcuts/Preferences
    It seems like a lot of shortcut actions are still missing for painting.
    Also I was missing the option to pick a tablet api (are you using wintab by default?), which is useful in some cases.
  1. Working with meshes
    I mentioned this in my previous post:
    Having some more options when working with imported fbx meshes would be very useful as well.
    Stuff like:
    A) If you have a mesh consisting of several parts, but you exported it as ONE mesh:
    Would be great if you could pick which mesh to paint on within that fbx.
    B) Being able to add objects to a layering project.
    For example: After I cleaned the metahuman to only consist of the merged mesh for body/head, I saved the eyes/mouth/Teeth in separate files. But of course it would be nice to texture all of them in context to each other.
    C) Being able to hide parts of the mesh while painting.
    Using some lasso selection or picking parts of a mesh by feature (connected polys or material IDs) to be able to hide parts of a mesh while painting would be super useful.
  1. Projection painting.
    I noticed a button for projection painting in the viewport for the layering project, but I couldn´t figure out what it does or how it works.
    I hope it works similar like Zbrushs “Spotlight” feature:
    You load in an image that overlays the mesh you wanna paint and then you can paint project it from different angles.
    Is that it and if so how exactly do I utilize this?
  2. UV manipulation
    A) I think if you offer a layering template that is meant for texturing, you may wanna consider making “UV” projection mode the default, instead of triplanar. Or even better. Make it “sensitive”: If the mesh you´re adding HAS uvs: Use UV projection. If it doesn´t: Use triplanar.
    Thats also something that threw me off a few times, as my textures seemed to be mapped completely wrong, when it was just set to triplanar.
    B) I WAS also looking for an option to flip textures and couldn´t find that. Because Zbrush for examples can flip textures the wrong way and then it would be great if I could correct that directly in instamat, instead of having to reexport them first.
  3. Performance
    First of all:
    I was a bit confused at first about the texture resolution I was working with.
    Only later did I understand, that the texture resolution I pick in the viewport is NOT my final resolution, its merely the preview resolution.
    Which is great, because the performance on my mesh with 11 UDIM tiles in 4k was NOT that great.
    Its rather unworkable to be honest.
    Even on my rtx3090 workstation with 64gb ram, just a simple brush stroke with just ONE layer active was really laggy.
    Being able to work on 2k or even 1k for the basic texturing gives pretty good performance, but I´m not sure how to work with it when it comes to the high fidelity details.
    Is there maybe a way for example to completely hide tiles I´m not working on, so I can work on the 4k tiles one by one, or just with the adjacent tile, if I need to paint across them?
  4. What exactly is the unified material setup?
    I´m still a it uncertain about what it does, compared to the material layering or the udim approach:
    Lets stick to my metahuman example: As the UVs are layed out as udims by default, instead of all in the uv 0-1 range, I HAVE to use udim anyways.
    But if I´d instead had one mesh and separate material IDS for the body and head for example, and the uvs where then layed out in the 0-1 range, but for different material ids:
    Would the unified material layer approach then let me paint across the seams, if I would create a material for the head and another one for the body?
  5. SSS
    Is it possible to preview subsurface scatterig in the viewport? I know you can add subsurface channels, but it didn´t look like subsurface, when painting on it.

Thats it for now, hope you can provide a quick answer for the udim issue at least, as that is mostly preventing me from diving deeper into the workflow and figuring out how to use it for what I´m working on as a personal project right now.

I hope after my current deadlines I´ll have some more time to evaluate the procedural material creation part as well and how we could use that at my work for texturing assets in a more automated way.
Because I already tried mesh baking and thats pretty fast on gpu and as far as I understood, I could use naming conventions to mass bake out whole folders with assets (maybe including autouving?) this way and then run them through a procedural material graph to bake in some more complex noise textures and then get them all sent out to unreal, where we can then use the baked information for procedural shading. Because right now we´re completely relying on triplanar mapping in Unreal and that has its limits, when it comes to deforming meshes.

Thanks for the feedback. I think this is too much feedback to address for me in detail though, but rest assured it’s all read. Maybe it helps you a bit to wait until we have basic documentation available, you need to keep in mind that we just launched and for that we have way above average documentation available - but certainly not enough.

If you can paint over all tiles, then it works as it should. If you share your mesh and the baked maps I can see what’s going on. But this is working as it should on my end. I load a UDIM mesh, bake, and all baked maps end up in the right tile.

Regaring performance, painting over 11 tiles at 4k is very expensive. The time it takes to do a single draw-call at 4k is already enormous, you’re trying to do 11 tiles * 6 channels at 4k. These are easily 66 draw operations at 4k. And you’re submitting many paint events per second. You’re simply GPU bound, you can see that because changing to 2k gets you good performance. Based on our VFX users, the performance of MAT is comparatively great. So I’m not too excited about your blanket statements without the right context. With that being said, you can disable UDIM tiles like you can disable layers. They will then not impact perf.
image
You can even control the resolution of your UDIM tiles individually:
image

Brush templates are implemented and can store brush dynamics and all. You can find them in the Paintbrush/Templates category in the library and you can create your own templates by RMB on the brush in the layer stack.

“B” doesn’t work → This is a regression, something else is mapped to B. It slipped in the prep for launch. Remap “Toggle Environment” to SHIFT+CTRL+B

A lot of the questions should be addressable via documentation, like applying a vignette to a brush, it’s the small icons at the top of the brush mask panel. You can find the brush docs here: Layer Channels | InstaMAT Documentation

SSS is not yet supported in the viewport preview.

Once again, this is a bit too much for to answer, but there’s a lot of great ideas and feedback here that we’re either already tracking or will track internally!

@Pixby we need to make sure that most of the questions here are covered by the documentation.

2 Likes

Yeah, like I said, no worries, you´ve got an amazin start with 1.0 in all areas!
I´m just really a sucker for good documentation, as I don´t like being dependent on tutorials and as a generalist my array of tools is just too big to memorize it all, so I am coming back to the same questions again and again and then I love it if I can find it as quickly as possible.
I know a lot of people prefer youtube tutorials for everything, but having to watch a 10 minute tutorial front to back (plus the ads, not to forget), just to find out where that one button is is just not my thing…

Yeah, I didn´t mean it like that. Its more a question of “what can I expect and what do I need to do to work around issues”.
And to be comepletely honest…I usually have at least 2-3 programs open at all times: 3ds max, zbrush, unreal, after effects…: Not really the best situation to start with, in terms of performance, its just what my job often requires as a one man army…:slight_smile:

That being said:
I played around a bit more and indeed you can pretty good performance, if you know what you´re doing:

  1. Hiding tiles you don´t need makes the biggest impact obviously.
  2. Make sure to set your memory limit. It was still defaulted to the 4gb I had set on my laptop for that project (or maybe thats the default for all projects)
  3. Lowering quality from “very high” to “low” didn´t even have any big visual impact for painting, but also improved performance.
  4. And then you can still lower your type, I lowered it from normalized 16 bit to normalized 8 bit.
    I´m not sure which of the latter two had a bigger impact, neither of them seemed to impact the image quality much though. I´d need to read up on what they actually do.
    Again, its awsome you can paint with even 1k resolution for the preview and still get the 4k texture out of it in the end, thats really not how I thought it worked…
    What is also awsome, when hiding udim tiles:
    Even when a tile is hidden, if you paint across its seam, some of the brush stroke up to a certain distance still gets transferred. Which is great, so you don´t have to worry about visible seams, when using the most performant workflow.

With the changes I made, I could paint almost completely lag free on up to 2 4k tiles on my 3090.
With Unreal Engine and chrome running in the background, over a local network with remote desktop…
And with your tip about downscaling the resolution for individual tiles, I could even paint across 4 tiles without any lag…
Maybe you could think about making an extra button to automatically downsample all udims except for one, but I´m not sure how useful that would actually be.
No complaints anymore! I´m getting really excited about texturing now…

Yeah, thanks, that fixed it.
I also found the templates, its a bit unintuitive how to find them and use them, as I´d expect them to be available somewhere in the brush settings.
I just dragged them onto the brush layer directly and that worked.

I also figured out that you can use ctrl+left drag to resize and ctrl and right drag to change brush strength, use shift and drag to constraint your brush like in photoshop and then shift and right mouse drag to rotate the light, which makes for a really nice painting experience.
Only thing I´m missing now is the “drag rectangle” brush option and how to use “lazy stroke”, then I´ll be completely at home…

I´d love to, I can share the asset from my personal project, I could just send you the whole instamat package.
Where should I send it to? Would a wetransfer be ok?

1 Like

That’s great to hear @insertmesh that you were seeing an increased level of performance. Also nice to hear that the documentation will be useful. We appreciate your patience while we build it out. It’s always great to hear how people use it and what they are looking for so we can improve it.

Regarding sending the mesh, you could send @voidberg a private message through the community forum with your link.

I too am looking forward to a set of tutorials for dummies, like me. I was an easel painter for over 50 years. I do mostly hand-painting on my 3D objects and find most of the software available to do this lacks decent brush creation capabilities. Watching the opening livestream a week ago I got pretty excited to see the few minutes at the end covering “painting” with InstaMat.

I know that people like myself are not the majority of your market but I do believe there is a large market out there for people wanting a better hand-painting software alternative. I am trying to learn nodes but time is of the essence for me and I would like to simply be able to see a tutorial where someone loads their FBX file or whatever, UDIMS or no UDIMS and goes over simply the parts that show how to alter the brush dynamics.

Spoiler alert, I don’t even know how to find where I can change the basic color in InstaMat.

So they probably don’t come much “dumber” than me.

1 Like

@mwsheeler We certainly want to create content for everyone who is interested in using InstaMAT covering any and all levels of experience. We’re currently creating articles and video content to do just as you mentioned. We appreciate your patience and love to hear about your excitement regarding the livestream.

Regarding changing the brush color I can show you here in a Layering project. We’re just putting the finishing touches on content around Layering projects which should be available very soon.

You can create a new brush layer using this button here. Then choose Multi-Channel Brush from the menu that pops up.

CleanShot 2024-01-31 at 17.20.13

You can find the button in the top toolbar or, like in the GIF below, at the bottom of the Layer Stack.

CleanShot 2024-01-31 at 17.18.35

You can then change the brush’s color by picking a color using the widget under the Base Color section. For a bigger color picker, you can right click the color widget or click on the color swatch next to the gradient of colors.

CleanShot 2024-01-31 at 17.25.19

Hope this helps and please feel free to ask any questions here on the community forum!

1 Like

Thanks, Pixby,
I didn’t expect such a quick reply. And one with examples. I’m afraid it fell on deaf ears (eyes). This time I couldn’t even get my chosen brush, the “default” brush to apply any brush stroke at all.

I started a New Project. I chose Layering and called it “Test.” In the Mesh box, I chose “Pick Package Resource” and selected “Tombstone.fbx” and double-clicked on it ( I didn’t see a box that allowed me to “Apply” or “Cancel” my selection.

I picked “Paintbrush” and chose the “Default” brush. I tried adding a Layer group because no brushstroke appeared when I tried to paint on the tombstone. But that didn’t work either.

So I had the shrug my shoulders and accept that I could not recall how I got the brush to work a couple of days ago when I did a successful brush stroke on the toolbox.
So thank you for your tips and the great gif demonstrating where to find the color selection but now you have a fair idea of how little I know about navigating InstaMat. I warned you that I needed a hand-held guide because I cannot decipher UIs as complex as InstaMat nor am I knowledgeable at all with nodes.

It might be hard to believe, but I am a competent illustrator. Somehow I had that gift all my life. Here is a small example;

So I will wait until someone does the “Idiots Guide to Hand Painting in InstaMat.”

Thank you again Pixby for trying to help me along with this. I will definitely try to learn Nodes so I can go beyond paintbrush customization and be able to dive into the potential of this amazing piece of software.

1 Like

That is absolutely gorgeous @mwsheeler! Thank you very much for sharing! The colors seem to pop right out of my screen!

I’d be glad to help you further with painting here in InstaMAT and it’s no trouble at all to answer any of your questions.

To start painting you first need to create a brush layer. This can be done with the (Add New Layer) button below the layer stack on the right.

CleanShot 2024-02-01 at 13.30.16

Choosing “Multi-Channel Brush” will allow you to pick colors using the color widget I mentioned prior.

CleanShot 2024-02-01 at 13.29.27

Once you have a brush layer like this selected, you can then go to the paintbrushes on the left and double click them to load their specific settings. In order for those to work, a brush layer such as a Multi-Channel Brush must first be created and selected on the right.

I hope this helps clarify!

I also wanted to mention that we just published a new documentation article on creating Layering projects. It’s still a work in progress, but we want to make sure the information is available. While the painting articles are still being created, I hope this article can shed some additional light.

1 Like

Thanks, Pixby. Will play around with this and will read the document you linked to!

1 Like

Is there a color-picking tool (and keyboard shortcut) that will allow me to pick a color from the canvas? In Photoshop it used to be the alt-key that would allow this. I am grateful that I can select colors from the hue bar and in the brush properties I can get a soft flow. What would be ideal is to be able to pick a color that is now in between the two base colors I used, in this case, the blue and the green. This way, if it is possible, I can have more control over the mixing of those base colors to achieve a more subtle blend.

As an aside, should I post this as a separate thread? It is a topic more specialized and if there were a topic header it might be more useful to others on the forum with a similar question.

Thanks again.

I suppose because the topic is “A couple of painting questions” it still works! :smile: However it’s up to you. If you’d like to create a new thread that’s totally fine.

You can pick colors using the color picker in the larger color popup. You can bring this up by either right clicking the color widget, or clicking the color swatch on the right. You can then use the eye dropper near the bottom of the color picker popup to sample a color in the scene.

CleanShot 2024-02-01 at 15.36.55

You are too fast for me Pixby. I found the way to get to the color picker. I was hoping there would be a keyboard shortcut to select this tool rather than having to click back down to the tool, select a color from the canvas, and then go down to click “ok” before continuing to paint.

Would be ideal to hit a keyboard shortcut like “alt” and immediately be able to continue painting as soon as you pick the color. That is my preference as a spoiled artist… to not break the flow.

Thanks again Pixby, I will cease and desist from pestering you any more today.

1 Like

We’re working on adding the swatches and pickers being more deeply integrated when painting. Right now, you have to go through the picker! It won’t be long until we have those features.

1 Like

Thanks for the reply voidberg. That’s great news.

@insertmesh I just wanted to let you know that, based on your comments about the performance of UDIM and memory handling, I did request an investigation.

It turns out that there are indeed regressions that crept into the paint engine code a few weeks before launch that slipped QA. It seems that our new memory scheduling does not play nice with some key components of layering, it’s like putting a break on MAT esp. noticable in your use-case. Disabling budgeting helps, but there are still a lot of side-effects that remain, that hamper performance.

The good news is that a lot of those issues are already being worked out and we’ve delayed the current update hoping that we might get UDIMs+painting back up to speed before releasing that. However, we have a hard deadline internally and there are only a few working hours left to fix this.

So if it’s not better with the upcoming update, it should be resolved with the next one.

Oh, good to know!
But still good to be aware of the performance enhancing options in the ui, especially for people not working on a beefy workstation…
Like me on the weekends…:slight_smile:

Ok, so, update on the UDIM workflow:
As mentioned on discord:
While painting on udim tiles works perfectly fine, displaying existing udim textures correctly currently does NOT work.
It would need udim masking, which is not yet implemented.

However, I found a workaround for me right now:
I got a maxscript that can move UVs from any udim tile to the 0-1 space.
I ran that on my metahuman, so the body texture is now also in 0-1 space and used that fbx as base.
Then instead of picking “Udim” when choosing the layering type project, I chose “multi Material (unified)”.

I created two layers, one for the body and one for the face and applied the existing textures on it.
The next part is a but confusing again:

  1. In order for the textures to only apply to the correct parts of the mesh, you have to use a mesh ID mask and that needs to be baked beforehand.
    With the mesh ID mask, you can then go to the picker tool and it displays the material ids as flat colors, so you can mask them out directly.
    You have to do this for both head and body.

Thats it, you can now create other layers and you´ll be able to paint across the body and face textures, as if they were separate udim tiles.

  1. The part I don´t quite get yet:
    I can select the materials in the top row of the layers, but that doesn´t seem to do anything.
    I´d expect that it would show me a different layer stack, depending on which material I select, but it doesn´t seem to do anything.
    I assume that is intentional, as that is the whole point of the “unified material” workflow: To have ONE layer stack, that applies to ALL materials. Unlike the normal material layering workflow, where you can see all materials in the viewport at once, but you can only paint on ONE at a time and each has their own layer stack.
    Its still confusing, and I´m not sure whether it has an effect when exporting out the material: Like, do the textures automatically get exported as “body_diffuse” and “head_diffuse” for example, based on which mesh ID they are painted on?

Is there an eyedropper shortcut now? Obvious it’s less important for a procedural workflow where you mostly only paint black and white masks. But it’s very essential for hand-painting!

Hello @raincole,

There currently is not a shortcut for the eyedropper, however I will mention this internally.

Thanks!

2 Likes